A quick how-to guide to installing C code tooling for Microsoft VS Code on MacOS.
Install Xcode command line tools on Mac OS
Open a terminal and type this, and wait a short while for Mac OS to fetch and install the package you need from Apple.
$ xcode-select --install
If you see this, you already installed everything you need:
$ xcode-select --install
xcode-select: error: command line tools are already installed, use "Software Update" to install updates
Install VS Code from Microsoft for C development
Let’s get started by installing VS Code on Mac OS. For the installation:
- Download Visual Studio Code for Mac OS Download link
- Open the browser’s download list and locate the downloaded archive.
- Extract the archive contents. Use double-click for some browsers or select the ‘magnifying glass’ icon with Safari.
- Drag ‘Visual Studio Code.app’ to the Applications folder, making it available in the Mac OS Launchpad.
- Add VS Code to your Dock by right-clicking on the icon to bring up the context menu and choosing Options, Keep in Dock.
Command Line Launcher
- Launch VS Code.
- Open the Cmd Palette (
Cmd+Shift+P) and typeshell commandto find the Shell Command: Install ‘code’ command in PATH command.

- Select the option, provide the administrator password.
- Restart the terminal for the new
$PATHvalue to take effect. - You’ll be able to type
code .in any folder to start editing files in that folder.
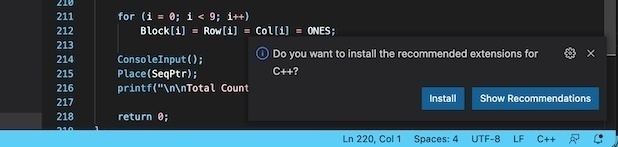
Install VS Code Extension Pack for C++ and C code
I find the easiest thing to do to get the correct C++/C code extensions for VS Code is to just open a .cpp file in the VS Code editor. If you don’t have one, try putting this in a new file called main.cpp and saving it:
#include <iostream>

int main() {
    std::cout << "Hello, World!";
    return 0;
}
Configure Default Build Task
From advice and notes from Microsoft VS Code web to configure clang on Mac OS we can see that next we need to use the menu to select Terminal > Configure Default Build Task and then select clang++ build active file
You should see a terminal appear in VS Code and the clang++ compiler build the main.cpp file, but we can be more flexible than that.
Inside the project sidebar, click to make a new folder and call it .vscode. Inside the folder add a file called tasks.json and insert the following:
{
  // See https://go.microsoft.com/fwlink/?LinkId=733558
  // for the documentation about the tasks.json format
  "version": "2.0.0",
  "tasks": [
    {
      "type": "shell",
      "label": "clang++ build active file",
      "command": "/usr/bin/clang++",
      "args": [
        "-std=c++17",
        "-stdlib=libc++",
        "-g",
        "${workspaceFolder}/*.cpp",
        "-o",
        "${workspaceFolder}/main"      ],
      "options": {
        "cwd": "${workspaceFolder}"
      },
      "problemMatcher": ["$gcc"],
      "group": {
        "kind": "build",
        "isDefault": true
      }
    }
  ]
}
Now, when you press CMD+Shift+B to build, you will see that the configuration from the tasks.json file is used instead.
Debugging C/C++ in VS Code on Mac OS
Create a file in the .vscode folder called launch.json and place the following in the file:
{
  // Use IntelliSense to learn about possible attributes.
  // Hover to view descriptions of existing attributes.
  // For more information, visit: https://go.microsoft.com/fwlink/?linkid=830387
  "version": "0.2.0",
  "configurations": [
    {
      "name": "clang++ - Build and debug active file",
      "type": "cppdbg",
      "request": "launch",
      "program": "${fileDirname}/${fileBasenameNoExtension}",
      "args": [],
      "stopAtEntry": true,
      "cwd": "${workspaceFolder}",
      "environment": [],
      "externalConsole": false,
      "MIMode": "lldb",
      "preLaunchTask": "clang++ build active file"
    }
  ]
}
Now, go back to your main.cpp file in the editor and either press F5 or from the main menu choose Run > Start Debugging. The first time will take a small amount of time for th debugger to find all the libraries in the paths and get administrator permissions. After that first run, the debugger should start up and halt on the main function and wait for you to start stepping the code. The variables will show in the side windows.
If you don’t want the debugger to stop on the main function, change the stopAtEntry value to false to no longer have the debugger stop on the main method when you start debugging.
Open a Terminal
Should you need to open a terminal at any point, use CTRL+Shift+`