A quick how-to guide to installing Python3 tooling for Microsoft VS Code on MacOS.
Install Python3 on MacOS
Let’s keep this nice and easy, use the official python.org installer, choose whomever is most stable for the smoothest experience: download python3 for macos
Installing VS Code on MacOS
Let’s get started by installing VS Code on MacOS. For the installation:
- Download Visual Studio Code for macOS Download link
- Open the browser’s download list and locate the downloaded archive.
- Extract the archive contents. Use double-click for some browsers or select the ‘magnifying glass’ icon with Safari.
- Drag ‘Visual Studio Code.app’ to the Applications folder, making it available in the MacOS Launchpad.
- Add VS Code to your Dock by right-clicking on the icon to bring up the context menu and choosing Options, Keep in Dock.
Command Line Launcher
- Launch VS Code.
- Open the Cmd Palette (
Cmd+Shift+P) and typeshell commandto find the Shell Command: Install ‘code’ command in PATH command.

- Select the option, provide the admin password.
- Restart the terminal for the new
$PATHvalue to take effect. - You’ll be able to type
code .in any folder to start editing files in that folder.
Install Python extensions
- Open the extensions manager
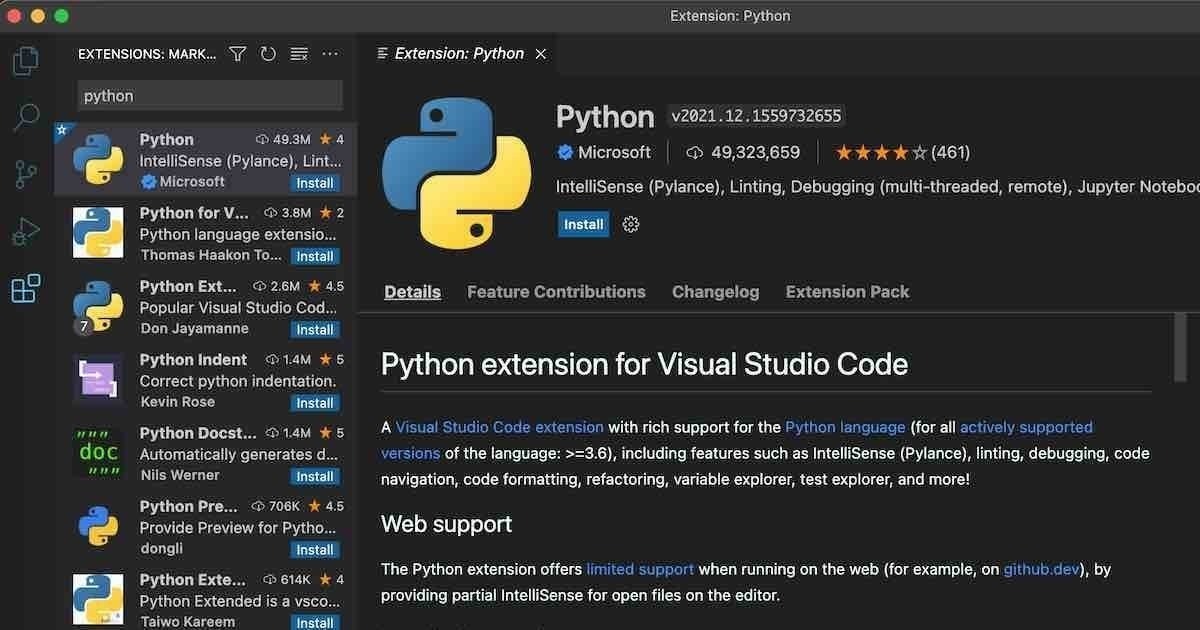
- Install the Python extension for VS Code from the Visual Studio Marketplace. The Python extension is named Python and it’s published by Microsoft. It is shown below:
- Next, check that the
python3interpreter is available on the command line by typing:
$ python3 --version
Python 3.9.10
- There will be a button on the post install configuration called: Select Python Interpreter. It is very important to select the Python3 interpreter from here.
- Test that you can run a Python script by creating a new file, and hitting run. Try this one:
import subprocess
cmd = [
    "/sbin/ifconfig",
    "-g"]
p = subprocess.Popen(
    cmd,
    stdout=subprocess.PIPE,
    stderr=subprocess.PIPE)
stdoutdata, stderrdata = p.communicate()

output = stdoutdata.decode()
if output:
    print(output)
else:
    print("ERROR!!!\n", stderrdata.decode())
The quick witted will have noted that there is not a -g option for /ifconfig, we should swap that to -a to get it to run nicely!
Debugging
Debugging Python is as straight forward as:
- Select the Debugger icon from the menu (icon: triangle with a bug!)
- Add a breakpoint (click the red dot next to the line numbers)
- Then selecting Run and Debug from the menu
- The usual step over, step into, options are available, and all the variables should be visible from the debugger menu
pip and venv
These two standard tools can be installed on MacOS easily. First, make sure your pip is up to date. This involves the usual whac-a-mole with Python3 on MacOS:
$ pip3 --version
pip 21.2.4 from /Library/Frameworks/Python.framework/Versions/3.9/lib/python3.9/site-packages/pip (python 3.9)

$ python3 -m pip install --upgrade pip
Requirement already satisfied: pip in /Library/Frameworks/Python.framework/Versions/3.9/lib/python3.9/site-packages (21.2.4)
Collecting pip
  Using cached pip-22.0.2-py3-none-any.whl (2.1 MB)
Installing collected packages: pip
  Attempting uninstall: pip
    Found existing installation: pip 21.2.4
    Uninstalling pip-21.2.4:
      Successfully uninstalled pip-21.2.4
  WARNING: The scripts pip, pip3 and pip3.9 are installed in '/Library/Frameworks/Python.framework/Versions/3.9/bin' which is not on PATH.
  Consider adding this directory to PATH or, if you prefer to suppress this warning, use --no-warn-script-location.
Successfully installed pip-22.0.2

$ echo 'PATH=/Library/Frameworks/Python.framework/Versions/3.9/bin:$PATH' >> ~/.bashrc
$ bash

$ python3 --version
Python 3.9.10

$ pip3 --version
pip 22.0.2 from /Library/Frameworks/Python.framework/Versions/3.9/lib/python3.9/site-packages/pip (python 3.9)

$ pip --version
pip 22.0.2 from /Library/Frameworks/Python.framework/Versions/3.9/lib/python3.9/site-packages/pip (python 3.9)
And now we have access to venv for Python3, we don’t need to install anything since it is part of the standard library since Python v3.3
$ python3 -m venv env

$ source env/bin/activate
(env) ...

$ which python3
/Users/jas/code/pygui/env/bin/python3

$ which python
/Users/jas/code/pygui/env/bin/python

$ python --version
Python 3.9.10

$ deactivate
For more info on pip and venv check out the official documentation