This post contains a cute script to mount and unmount a ram disk device on MacOS, and also a couple of notes about wear leveling on SSD and how this script is different to tmpfs from Unix/Solaris.
What is a RAM Disk?
A RAM disk is a representation of a hard disk using RAM resources, and it can take the form of a hardware device or a virtual disk. In software, it is basically a block of memory that is being treated as if it were a hard disk drive through the use of dedicated software, which takes a block from the RAM pool and uses it as a dedicated storage area as if it were a hard drive, but with exceedingly faster performance compared to a hard disk. In the form of a hardware device, it is just a bunch of RAM cards or sticks housed together in a case with drive electronics to make it interact with disk drive technologies such as SATA and IDE, and a backup battery so that data is not lost.
Are RAM Disk still in use?
They are used mainly in specialist Unix setups, e.g. for fast compilation of huge projects (looking at you Chromium!). A modern M2 drive or NVMe drive that is shipped with a laptop can respond in 0.05ms, and is usually significantly faster than a spinning disk response time (about 16ms). Sure, RAM can respond in 50ns when close to the processor. But, most people really don’t have a use case for that. And RAM is significantly more expensive than NVMe drives (per GB of storage).
What are RAM Disk used for?
The techopedia website has the following to say:
A RAM disk serves one purpose: to make I/O process performance faster and more efficient. Because RAM is the fastest type of storage, it makes sense to use it for storing data and programs so that they can be run and accessed faster.
However, we are forgetting one other very very important use case… volatile storage can forget things. And sometimes we WANT our computers to forget things. RAM Disk can be used to create and temporarily store secret key material.
Modern Computers Forget Nothing
In the days of iCloud and Google Drive and automagical backups modern computers remember everything.
Did you know about SSD Wear Leveling? Wear leveling is a technique that some SSD controllers use to increase the lifetime of the memory. The principle is simple: evenly distribute writing on all blocks of a SSD so they wear evenly. All cells receive the same number of writes, to avoid writing too often on the same blocks.
A basic file system delete just removes the pointer to the file from the journal (like the index of the disk file library). So the file is still there and can be forensically retrieved very easily.
In the good old day utilities like shred and srm would over write a file with junk or zeros until it was definitely wiped out. The old DoD guideline suggested that overwriting 7-times was probably enough to delete a file from a magnetic store/spinning disk. A Professor called Peter Gutmann made a method in the 1990s involving a 35-pass secure delete?!
But, with SSD/NVMe and wear-leveling a controller on the disk is choosing where to store our files for the minimum number of write operations to any given sector to preserve the life of the disk. This means that even if we write zeros all over our file, we may not be even writing to the location the file is saved at. What?!?! True story! So, forensics can have a party with an SSD.
So, how can we ever be truly sure that an SSD file has been deleted? You can’t!
What about my secret key material?
So now we are getting to the real question. How can we create secret key material that is supposed to go into a long term store on an SSD and be sure it has been deleted when we type rm -f secret.key?
We can’t.
But, we can store it in volatile memory, such as a RAM Disk…
How do we make a RAM Disk on Unix?
Something simple like this:
$ mkdir /tmp/ramdisk
$ sudo mount -t ramfs -o size=1M ramfs /tmp/ramdisk
$ sudo chown ${USER}:${logname} /tmp/ramdisk
We now have 1 Megabyte of RAM dedicated to a virtual disk mounted at /tmp/ramdisk. And when the computer is powered off, the storage will be lost for ever.
Or we can remove the RAM disk with:
$ sudo umount /tmp/ramdisk
How do we make a RAM Disk on Mac OS
It is not quite as simple. However, I discovered this really nice Gist on GitHub to show us the way.
Put these two files in your $HOME/bin directory (make sure the directory is included in your path).
Call this one mount-ram.sh:
#!/bin/sh

# This program has two feature.
#
# 1. Create a disk image on RAM.
# 2. Mount that disk image.
#
# Usage:
#   $0 <dir> <size> <name>
#
#   size:
#     The `size' is a size of disk image (MB).
#
#   dir:
#     The `dir' is a directory, the dir is used to mount the disk image.
#
# See also:
#   - hdid(8)
#

mount_point=${1}
size=${2:-64}
name=${3}

mkdir -p $mount_point
if [ $? -ne 0 ]; then
    echo "The mount point didn't available." >&2
    exit $?
fi

sector=$(expr $size \* 1024 \* 1024 / 512)
device_name=$(hdid -nomount "ram://${sector}" | awk '{print $1}')
if [ $? -ne 0 ]; then
    echo "Could not create disk image." >&2
    exit $?
fi

newfs_hfs -v $name $device_name > /dev/null
if [ $? -ne 0 ]; then
    echo "Could not format disk image." >&2
    exit $?
fi

mount -t hfs $device_name $mount_point
if [ $? -ne 0 ]; then
    echo "Could not mount disk image." >&2
    exit $?
fi
Call this one umount-ram.sh:
#!/bin/sh

# This program has two features.
#
# 1. Unmount a disk image.
# 2. Detach the disk image from RAM.
#
# Usage:
#   $0 <dir>
#
#   dir:
#     The `dir' is a directory, the dir is mounting a disk image.
#
# See also:
#   - hdid(8)
#

mount_point=$1
if [ ! -d "${mount_point}" ]; then
    echo "The mount point didn't available." >&2
    exit 1
fi
mount_point=$(cd $mount_point && pwd)

device_name=$(df "${mount_point}" 2>/dev/null | tail -1 | grep "${mount_point}" | cut -d' ' -f1)
if [ -z "${device_name}" ]; then
    echo "The mount point didn't mount disk image." >&2
    exit 1
fi

umount "${mount_point}"
if [ $? -ne 0 ]; then
    echo "Could not unmount." >&2
    exit $?
fi

hdiutil detach -quiet $device_name
To use this first make the scripts executable:
$ chmod +x $HOME/bin/mount-ram.sh
$ chmod +x $HOME/bin/umount-ram.sh
Now make a RAM disk:
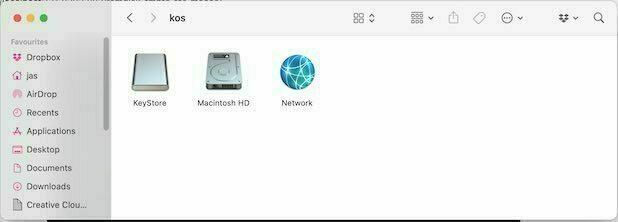
$ ./mount-ram.sh /tmp/keystore 1000000 KeyStore
And to remove the RAM disk, either power down the machine, or:
$ ./umount-ram.sh /tmp/keystore/
NOTE There was a comment on the original gist. I should make it here too…
This isn’t quite the same. On Solaris (where tmpfs originated) and on FreeBSD (and probably also on Linux, but I don’t know for certain), tmpfs is swap-backed. Memory pressure on the system will result in the contents of tmpfs getting pushed out to your on-disk swap partition. By way of contrast, what you’ve done above is to create a locked-in-memory ramdisk, which will not get swapped out, making that chunk of memory unavailable until the ramdisk is discarded.
Typically, such fixed ramdisks need to be fairly small, lest they exert their own significant memory pressure on the system, slowing it down in other ways. True tmpfs is much more flexible, as it will only keep your files in RAM opportunistically, but is willing to yield physical memory when the system is stressed, and will do so without losing the cached contents until the next reboot.